Check Number Can Never Be Used Again
In some cases, numbers in a worksheet are really formatted and stored in cells as text, which can cause problems with calculations or produce confusing sort orders. This issue sometimes occurs subsequently you import or copy information from a database or other external data source.
Numbers that are formatted every bit text are left-aligned instead of right-aligned in the cell, and are often marked with an error indicator.
What practise you desire to do?
-
Technique 1: Catechumen text-formatted numbers past using Fault Checking
-
Technique two: Convert text-formatted numbers past using Paste Special
-
Technique iii: Apply a number format to text-formatted numbers
-
Turn off Error Checking
Technique 1: Convert text-formatted numbers past using Error Checking
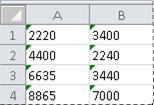
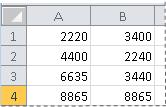
If you import data into Excel from another source, or if you type numbers into cells that were previously formatted as text, you may see a minor dark-green triangle in the upper-left corner of the cell. This error indicator tells you that the number is stored as text, as shown in this example.
If this isn't what you want, you tin follow these steps to catechumen the number that is stored equally text back to a regular number.
-
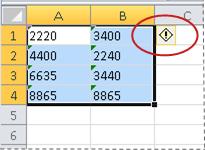
On the worksheet, select any unmarried cell or range of cells that has an error indicator in the upper-left corner.
How to select cells, ranges, rows, or columns
To select
Do this
A single prison cell
Click the cell, or printing the arrow keys to move to the cell.
A range of cells
Click the offset cell in the range, then drag to the final prison cell, or hold downwards Shift while you printing the arrow keys to extend the choice.
You tin likewise select the get-go cell in the range, and so press F8 to extend the selection by using the arrow keys. To stop extending the selection, printing F8 once more.
A big range of cells
Click the get-go cell in the range, and then concur downwardly Shift while you click the last cell in the range. You can scroll to brand the last cell visible.
All cells on a worksheet
Click the Select All button.

To select the entire worksheet, you can besides press Ctrl+A.
If the worksheet contains data, Ctrl+A selects the current region. Pressing Ctrl+A a 2d fourth dimension selects the entire worksheet.
Nonadjacent cells or prison cell ranges
Select the outset cell or range of cells, and and then hold down Ctrl while you select the other cells or ranges.
You tin also select the first cell or range of cells, then press Shift+F8 to add another nonadjacent jail cell or range to the selection. To end adding cells or ranges to the selection, press Shift+F8 once more.
You cannot cancel the selection of a jail cell or range of cells in a nonadjacent selection without canceling the unabridged selection.
An entire row or cavalcade
Click the row or cavalcade heading.
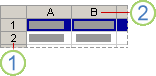
i. Row heading
2. Cavalcade heading
You can as well select cells in a row or column by selecting the showtime cell then pressing Ctrl+Shift+Arrow cardinal (Right Pointer or Left Arrow for rows, Up Arrow or Downwardly Arrow for columns).
If the row or column contains data, Ctrl+Shift+Pointer primal selects the row or cavalcade to the last used cell. Pressing Ctrl+Shift+Arrow key a second time selects the entire row or column.
Adjacent rows or columns
Drag beyond the row or column headings. Or select the offset row or column; then concur down Shift while you lot select the last row or column.
Nonadjacent rows or columns
Click the column or row heading of the first row or column in your pick; and so hold down Ctrl while y'all click the column or row headings of other rows or columns that you want to add to the selection.
The first or concluding jail cell in a row or column
Select a cell in the row or column, and then press Ctrl+Arrow primal (Correct Arrow or Left Pointer for rows, Upwardly Pointer or Down Arrow for columns).
The first or last cell on a worksheet or in a Microsoft Part Excel table
Press Ctrl+Home to select the first cell on the worksheet or in an Excel list.
Press Ctrl+End to select the terminal cell on the worksheet or in an Excel listing that contains data or formatting.
Cells to the last used cell on the worksheet (lower-right corner)
Select the commencement cell, and then press Ctrl+Shift+Stop to extend the selection of cells to the last used cell on the worksheet (lower-right corner).
Cells to the beginning of the worksheet
Select the beginning cell, and then press Ctrl+Shift+Dwelling to extend the choice of cells to the get-go of the worksheet.
More or fewer cells than the active selection
Concur down Shift while you lot click the last cell that you want to include in the new selection. The rectangular range between the agile cell and the cell that y'all click becomes the new selection.
To abolish a selection of cells, click any prison cell on the worksheet.
-
Side by side to the selected prison cell or range of cells, click the error button that appears.
-
On the menu, click Convert to Number. (If you want to simply go rid of the mistake indicator without converting the number, click Ignore Error.)
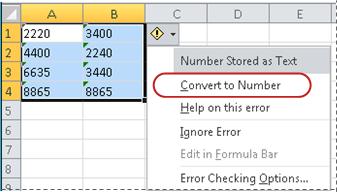
This action converts the numbers that are stored equally text back to numbers.
Once yous take converted the numbers formatted as text into regular numbers, you tin can modify the fashion the numbers appear in the cells by applying or customizing a number format. For more than information, see Available number formats.
Height of Page
Technique 2: Convert text-formatted numbers by using Paste Special
In this technique, you multiply each selected prison cell past i in gild to force the conversion from a text-formatted number to a regular number. Because you lot're multiplying the contents of the jail cell past 1, the result in the cell looks identical. Yet, Excel actually replaces the text-based contents of the cell with a numerical equivalent.
-
Select a bare cell and verify that its number format is General.
How to verify the number format
-
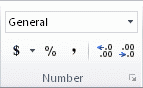
On the Home tab, in the Number group, click the arrow side by side to the Number Format box, and and then click General.
-
-
In the jail cell, blazon 1, and then press ENTER.
-
Select the cell, and so press Ctrl+C to copy the value to the Clipboard.
-
Select the cells or ranges of cells that incorporate the numbers stored as text that you want to convert.
How to select cells, ranges, rows, or columns
To select
Exercise this
A unmarried cell
Click the cell, or press the arrow keys to move to the cell.
A range of cells
Click the get-go cell in the range, and then drag to the terminal prison cell, or concur down Shift while y'all printing the arrow keys to extend the selection.
You tin also select the first cell in the range, and and so press F8 to extend the option by using the arrow keys. To terminate extending the selection, printing F8 once more.
A big range of cells
Click the first cell in the range, and so hold down Shift while you click the last cell in the range. Yous can roll to make the last cell visible.
All cells on a worksheet
Click the Select All push.
To select the entire worksheet, you can also printing Ctrl+A.
If the worksheet contains data, Ctrl+A selects the electric current region. Pressing Ctrl+A a second time selects the unabridged worksheet.
Nonadjacent cells or cell ranges
Select the first jail cell or range of cells, and so hold down Ctrl while yous select the other cells or ranges.
Yous tin too select the beginning jail cell or range of cells, and then press Shift+F8 to add another nonadjacent cell or range to the pick. To stop calculation cells or ranges to the selection, printing Shift+F8 once again.
You cannot cancel the selection of a jail cell or range of cells in a nonadjacent selection without canceling the entire selection.
An entire row or cavalcade
Click the row or column heading.
1. Row heading
two. Column heading
You can too select cells in a row or column by selecting the beginning jail cell and then pressing Ctrl+Shift+Pointer key (Correct Arrow or Left Arrow for rows, Up Pointer or Downward Arrow for columns).
If the row or column contains information, Ctrl+Shift+Arrow central selects the row or cavalcade to the last used jail cell. Pressing Ctrl+Shift+Arrow primal a second time selects the unabridged row or column.
Side by side rows or columns
Drag across the row or column headings. Or select the get-go row or column; and then hold down Shift while you select the last row or column.
Nonadjacent rows or columns
Click the column or row heading of the starting time row or cavalcade in your option; then concord down Ctrl while you click the column or row headings of other rows or columns that yous want to add together to the selection.
The offset or last prison cell in a row or column
Select a prison cell in the row or cavalcade, and and then press Ctrl+Arrow key (Correct Arrow or Left Arrow for rows, Up Pointer or Downwardly Arrow for columns).
The first or final cell on a worksheet or in a Microsoft Office Excel table
Press Ctrl+Dwelling to select the first cell on the worksheet or in an Excel list.
Press Ctrl+End to select the last jail cell on the worksheet or in an Excel listing that contains information or formatting.
Cells to the last used jail cell on the worksheet (lower-correct corner)
Select the first prison cell, and so printing Ctrl+Shift+Stop to extend the selection of cells to the last used prison cell on the worksheet (lower-right corner).
Cells to the first of the worksheet
Select the first cell, and so printing Ctrl+Shift+Dwelling house to extend the selection of cells to the beginning of the worksheet.
More or fewer cells than the agile selection
Hold downwards Shift while you click the concluding cell that you want to include in the new selection. The rectangular range between the agile cell and the cell that you click becomes the new selection.
To cancel a pick of cells, click any cell on the worksheet.
-
On the Home tab, in the Clipboard group, click the arrow beneath Paste, and then click Paste Special.
-
Under Operation, select Multiply, and and then click OK.
-
To delete the content of the jail cell that you typed in step 2 after all numbers have been converted successfully, select that cell, and so press DELETE.
Some accounting programs display negative values as text, with the negative sign (–) to the right of the value. To catechumen the text string to a value, you lot must apply a formula to render all the characters of the text string except the rightmost character (the negation sign), and so multiply the result by –1.
For example, if the value in jail cell A2 is "156–" the post-obit formula converts the text to the value –156.
| Data | Formula |
| 156- | =Left(A2,LEN(A2)-ane)*-1 |
Meridian of Page
Technique three: Use a number format to text-formatted numbers
In some scenarios, you don't accept to catechumen numbers stored every bit text dorsum to numbers, as described before in this article. Instead, you can but utilise a number format to achieve the same result. For case, if you enter numbers in a workbook, and then format those numbers as text, y'all won't see a green error indicator appear in the upper-left corner of the cell. In this case, yous can utilize number formatting.
-
Select the cells that contain the numbers that are stored as text.
How to select cells, ranges, rows, or columns
To select
Do this
A single cell
Click the cell, or press the arrow keys to move to the cell.
A range of cells
Click the kickoff cell in the range, and then drag to the terminal cell, or concord downward Shift while you printing the pointer keys to extend the selection.
You can likewise select the first cell in the range, and and so printing F8 to extend the pick by using the pointer keys. To cease extending the selection, press F8 over again.
A large range of cells
Click the commencement prison cell in the range, and so concur downwards Shift while you lot click the terminal cell in the range. You can curl to brand the terminal prison cell visible.
All cells on a worksheet
Click the Select All push button.
To select the entire worksheet, y'all can also press Ctrl+A.
If the worksheet contains information, Ctrl+A selects the current region. Pressing Ctrl+A a 2d time selects the entire worksheet.
Nonadjacent cells or jail cell ranges
Select the commencement cell or range of cells, and so concur down Ctrl while you select the other cells or ranges.
You lot tin as well select the offset jail cell or range of cells, and so press Shift+F8 to add another nonadjacent cell or range to the selection. To finish adding cells or ranges to the selection, press Shift+F8 once again.
You lot cannot cancel the selection of a prison cell or range of cells in a nonadjacent selection without canceling the entire selection.
An entire row or column
Click the row or column heading.
one. Row heading
ii. Cavalcade heading
Yous can likewise select cells in a row or column by selecting the offset prison cell and then pressing Ctrl+Shift+Arrow key (Right Arrow or Left Arrow for rows, Upwardly Arrow or Down Arrow for columns).
If the row or column contains information, Ctrl+Shift+Arrow key selects the row or column to the concluding used cell. Pressing Ctrl+Shift+Arrow cardinal a second time selects the entire row or column.
Adjacent rows or columns
Elevate across the row or column headings. Or select the kickoff row or cavalcade; then hold downward Shift while you select the last row or column.
Nonadjacent rows or columns
Click the column or row heading of the first row or column in your selection; and then hold down Ctrl while y'all click the cavalcade or row headings of other rows or columns that you want to add to the choice.
The beginning or terminal cell in a row or column
Select a prison cell in the row or column, so press Ctrl+Arrow key (Correct Arrow or Left Pointer for rows, Upwards Arrow or Downward Arrow for columns).
The first or last cell on a worksheet or in a Microsoft Office Excel table
Press Ctrl+Domicile to select the get-go jail cell on the worksheet or in an Excel list.
Press Ctrl+End to select the last cell on the worksheet or in an Excel listing that contains information or formatting.
Cells to the concluding used cell on the worksheet (lower-right corner)
Select the first jail cell, and and so press Ctrl+Shift+End to extend the selection of cells to the terminal used jail cell on the worksheet (lower-right corner).
Cells to the beginning of the worksheet
Select the commencement cell, and then printing Ctrl+Shift+Home to extend the selection of cells to the beginning of the worksheet.
More or fewer cells than the agile selection
Concord downward Shift while you click the last prison cell that you want to include in the new selection. The rectangular range betwixt the agile cell and the cell that you click becomes the new selection.
To abolish a selection of cells, click any cell on the worksheet.
-
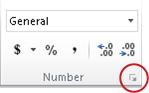
On the Abode tab, in the Number group, click the Dialog Box Launcher next to Number.
-
In the Category box, click the number format that you want to use.
For this procedure to consummate successfully, brand sure that the numbers that are stored as text practise not include actress spaces or nonprintable characters in or around the numbers. The extra spaces or characters sometimes occur when yous copy or import data from a database or other external source. To remove extra spaces from multiple numbers that are stored as text, you tin can utilize the TRIM part or Make clean office. The TRIM office removes spaces from text except for single spaces betwixt words. The Make clean function removes all nonprintable characters from text.
Meridian of Folio
Turn off Error Checking
With error checking turned on in Excel, you run across a pocket-sized green triangle if you lot enter a number into a cell that has text formatting applied to information technology. If you don't want to see these error indicators, you tin turn them off.
-
Click the File tab.
-
Under Help, click Options.
-
In the Excel Options dialog box, click the Formulas category.
-
Under Error checking rules, clear the Numbers formatted equally text or preceded by an apostrophe cheque box.
-
Click OK.
Meridian of Page
Source: https://support.microsoft.com/en-us/office/fix-text-formatted-numbers-by-applying-a-number-format-6599c03a-954d-4d83-b78a-23af2c8845d0
0 Response to "Check Number Can Never Be Used Again"
Post a Comment